


The factory Snap-on toolbox drawer removal shims are inadequate for many other applications because they are way too short, and it's what led me to find a shim that not only worked better on damaged Snap-on boxes but other toolbox brands as well.
If you ever plan on restoring more than one toolbox, this set is guaranteed to work with all brands of friction drawer slide toolboxes and is also guaranteed to last a lifetime. A common problem is that grease & other lubricants were continually sprayed to keep the drawers working since they didn't know how to remove them for periodic cleaning, but over many decades, the grit & old grease solidified into a very hard putty and it is also why the tips of the shims have been sharpened; for better cutting and also being able to slip through a tight spot caused by physical damage to an internal drawer slide and rail assembly.
==========================================================
Note: If uninterested in reading about toolbox restoration, please scroll to the bottom for shipping information.
===========================================================
The wider shim works much better when attempting to remove the wider drawer slides as well as also working better on the older model toolboxes. Tape the shims in place if you are having difficulty in keeping them in a proper position as you pull on the drawer. It sometimes works better to remove the entire drawer slide and drawer assembly first whenever dealing with Huot, Cornwell, Craftsman, and other earlier brands of toolboxes. Once you have the entire drawer & slide assembly out, then you can remove slides from the drawers, and also don't be afraid to insert from the rear if things just aren’t working.
Cornwell had been a lower-cost alternative to Snap-on. The thing that struck me after pulling the drawers was the drawer support rails were only tacked front & back with nothing in between but an open gap because the box didn't have nicely finished interior walls. It means a heavier drawer would be more apt to fail. Oftentimes it is the larger drawers on a tool cabinet where internal damage from overloading is prevalent and I have a set of old Snap-on drawer slides that at first glance look fine, but the ribs on the drawer slide had completely pulled away with a hairline crack running the length of the drawer slide. It is another thing to check if a drawer is proving exceptionally difficult to troubleshoot.
If you happen to run into a drawer that is exceedingly difficult, don’t become discouraged, keep playing with it, you have the right tools with the universal shims. Pull the drawers above & below the problem drawer and check for any physical damage or binding, then see if you can insert a shim from behind in an attempt at removing everything, both the drawer and drawer slide.
Another identification tip for an early Cornwell box is instead of having a keylock like a regular Snap-on toolbox, it has a tiny padlock hasp with no pull handle, the entire logo panel is totally flat with the hasp located at bottom center. Early Cornwell boxes were originally flat back with an orange Cornwell logo stenciled across the swing-over side panel. By 1935, Snap-on boxes were showing superb craftsmanship inside & out and if looking for item-specific information for your model of toolbox, your best bet are websites like GarageJournal due to their numerous toolbox-related threads with plenty of user-submitted photos.
If a drawer requires a little oil to remove a sticky spot or a hitch in the action, by all means apply a little oil if you think it would help things a little more. I usually use white lithium or gun oil in a regular spray can to lubricate my own toolboxes. Before applying any grease, perhaps the slide rails may need additional cleaning where small pieces of sandpaper & Goo Gone degreaser are used to clean out the channels and keep pulling small pieces of paper towel through until they begin to come out clean.
Another strategy if dealing with a warped drawer slide or drawer is switching drawers & drawer slides around because for whatever reason, it sometimes seems to help. If all other attempts at straightening have failed, take a metal file and removing a certain amount of material from the damaged area of the slide as well as taking a piece of sandpaper and smoothing things back down. Most home improvement stores offer a 3-pack of metal finishing sandpaper, coarse, medium & fine that works perfectly for most toolbox restoration projects.
I’ve always found that by having my toolbox projects sitting on a table in a corner inside my house, my restoration projects tend to move a little faster because I don’t have to go out to a garage or workshop and even in bare feet & bathrobe, I am still able to devote a few extra minutes per day toward my projects and it all adds up very quickly in the form of a quicker turnaround time.
Once the drawers have been removed, younger family members could also be enlisted to do some of the tedious cleaning & sanding work and allowing them to share in a little of the profit. If you want to make money by doing a quick restore of old tool cabinets and flipping for resale, having a small army of little worker bees and even grandma pitching in, it could potentially earn any household a few extra hundred dollars per month. Give the little tykes a drawer and piece of sandpaper and making them work for their allowance.
Another restoration shortcut is to only paint the front, the top compartment and the underside of the top lid if the rest of the toolbox on the sides & back look relatively fine otherwise. Taking a small paint brush and doing touchups, even if the paint isn't perfectly matched still looks good and adds to the rustic look of the box. But if you intend on doing a full repaint of a tool cabinet, it's always well worth the time to remove the drawer handles. Drilling out rivets only takes a few minutes and a package of replacement nuts & bolts to reinstall the handles is well under 10 dollars, so go for it. Use a wider drill bit closer to the diameter of your rivet.
Par - X is a lesser-known Snap-on budget line, even a step below Blue Point, and ran from the mid-60s to the mid-70s, but the little top chest I have is one of my favorites because it's such a perfect size and while a slightly thinner gauge of metal, Snap-on's workmanship and quality are still very much present. If ever wanting to look at old Snap-on catalogs to get a better idea of what was offered over the years, the website CollectingSnap-on is your best bet. There are other websites that also host old Wards & Sears catalogs if ever attempting to research their tools & boxes.
External rust patches aren't a big deal to treat, but I would strongly advise passing on any old toolbox with extensive internal rusting because there are just too many tight spots and crevices where proper rust removal is nearly impossible unless sandblasting. All I ever usually bring to the car wash is an old ice cream bucket, degreaser dishwashing soap, a green pad & wire scrubbing pad, gloves and one towel to get the worst of the water off before reloading in my car.
Even if working 60 hours a week, you should still be able to easily restore a larger tool cabinet in 2 to 3 weeks easy by using my shortcuts and who knows, you may eventually be able to turn a profit with your little side hobby.
You could also try making innovative computer desks out of old toolboxes and integrating plenty of power outlets, lights & USB ports, and mounted on a nice set of caster wheels instead of the crappy old tool cart type.
Once you learn how to quickly remove the drawers, you could easily hide a few valuables in the bottom or taped to the back and no burglar is likely familiar with toolbox drawer removal, let alone having to try and remove 20 of them. You could buy a cheap little gun safe and filling it with pipes, old tools and bricks as a decoy to keep the burglars occupied while all the good stuff was hidden in an old tool cabinet.
Never leave items disassembled & lying about for months, it’s too easy to lose parts.
I use a 2 or 3-pack of plastic painter’s drop clothes to cover the floor & and table whenever I am bringing one of my restoration projects indoors and it makes clean-up much easier.
On Huot toolboxes, please be careful whenever removing the lid stays that prevent the top lid from overextending during opening because if you drop them down the hole in the top compartment, your only option for recovery is likely cutting into the small open holes in the rear sidewalls of the interior of your toolbox and using tin snips to chew the hole a little bigger in order to facilitate an easier recovery of the missing lid stay. No, it doesn't look very nice, but no one is going to see it anyway once the drawers have been reinstalled. And because Huot's lids are so heavy, they need to be supported properly or serious damage to the top & hinges is likely to occur.
Snap-on boxes have a dirt trap down in the base of the box where the locking latch connects because it doesn't have a good way to drain, even if power washed, so I drill a 3/8 hole directly below the locking latch. Please be sure to not only spray down in the hole for the latch, but also spraying down the two top side ribs on the face of the toolbox.
I like Rustoleum International Harvester red because it looks more of a scarlet red and isn’t so bright which gives it more of a natural aged appearance as well as also making it easier to blend in a freshly painted piece of IH red with an older more aged color of red normally found on earlier Craftsman &Snap-on red toolbox models. So even though you may have a base cart in an aged red patina that really doesn't need to be repainted, atop chest painted with a fresh layer of IH red still tends to blend in and doesn’t look so mismatched, a common scenario if ever attempting to build a stack piece by piece.
It’s always better to buy a full quart of paint for most multi-drawer top chests, especially if planning on painting inside the box and drawers. A smaller can of paint isn’t large enough.
Rustoleum glitter paint doesn't work like traditional glitter paint and somewhat fails in that respect, but an unintended consequence is that it still leaves behind a nice textured finish, like a finely-grained piece of colored vinyl. And instead of painting a box with regular smooth finished paint, why not experiment with a two-toned finish, painting the rest of the box a smooth finish, but with a textured main panel on the panel containing the badge or a two-tone on the front of a box with the drawers one color and the frame another.
A small half-pint of glitter paint is just enough to cover the main panel of a Snap-on top chest. Keep applying multiple layers with a small roller until satisfied with the amount of texturing. Even though a textured finish, it doesn't seem to hold any dirt and is still easy to wipe clean.
If brush painting metal, use a foam brush, a toolbox often has a lot of little nooks & crannies to snag the bristles of a conventional paintbrush. I use a 3-inch paint roller for most of my boxes and it goes so fast. It is also unnecessary to paint the inside of the drawers if the interior paint is still in good shape. Spot paint any bare areas and it doesn't even need to be of a matching color, and once a fresh piece of drawer liner has been installed and the drawer filled with tools that nobody ever seems to notice as long as the box was clean, didn’t smell, and the drawers were smooth & quiet.
Once a clean restored box, it would never do to fill it up with dirty & smelly old tools, so perhaps it's time for a bath in a bucket of degreaser soap, a good scrubbing in the shower, and then drying them on a cookie sheet in the oven.
Many older boxes have damaged internal components because at some point, a tool had shifted and blocked a drawer, so the drawer received a good karate kick that bent everything out of alignment inside. If unsuccessful in the removal of a particular drawer, besides checking for damage, also look for any repairs made by a previous owner where a small bolt or rivet may have been used to connect a drawer slide to a drawer.
If needing a replacement lock, any 5/8 in. or 16 mm cabinet lock works perfectly fine. Don't waste your money on a combination lock for a toolbox because the numbers are too small to be functional. If you have an older Snap-on model where the core of the lock slides out as a separate piece, there are a series of flat brass plates that when removed, it opens with any key or screwdriver, yet the lock still retains its original appearance & function.
Any 3-inch drawer handle works fine on a Snap-on box if you take a small round file and widen the holes 1/16 in. which opens up an unlimited choice of drawer handles to choose from because the stock handle is often crappy looking.
The best deal on drawer liner is probably the gray vinyl diamond plate floor runner usually sold through Lowes, or a basic black ribbed floor runner usually found near the back of the store and needs to be cut from a larger roll.
Don't be afraid to sand by hand, you would be surprised by how much could be accomplished with a half hour of hand sanding. Use a grinder with a knotted wire cup if needing to chew on badly rusted areas. It is also unnecessary to strip off old layers of paint if the metal isn't rusty, give everything a light sanding, a good wiping and then paint.
A package of disposable exam gloves while expensive, are a very nice luxury to have whenever sanding & painting so you aren't endlessly washing paint & powdered grit off your hands. Whenever I'm at a hospital or clinic, I try to snag an extra pair. The gloves are especially nice because they make it easier to squeeze a few extra minutes of restoration time per day because it's that many minutes of less handwashing per session and more additional minutes to devote to sanding & cleaning.
eBay is your best bet if looking for vintage replacement toolbox parts, set a bidder alert keyword to be notified of any new listings. I’ve bought a few drawer slides and even though I may have had to wait a year or so, they eventually showed up, so please be patient and don't scrap or pass on an otherwise nice tool cabinet. Just live with it until whatever it is you need eventually shows up for sale.
You might be able to make a little money parting out old beater toolboxes on eBay, there are other folks who are already doing it.
You could also also use the restoration of an old beater box as a project for kids and letting them paint & decorate it however they wish. Perhaps they would become interested in the hobby and develop important tool handling & metal finishing skills in the process. Perhaps they could restore boxes for a percentage of the profits. You could even teach a toolbox restoration class to the Cub Scouts. Why not restore a cute little toolbox for your wife and make a Christmas or birthday present out of it? Women especially like the smaller top chests for their crafting supplies & home office.
There are generally 4 different types of early toolbox drawer slides, Snap-on, Mac, Huot & Craftsman style drawer slides, and all the other boxes in the industry were usually copied from one of their designs. It's very unlikely you would ever run into a different type of drawer slide system, so don't worry, bid with confidence on an unknown older brand because you know how to pull the drawers on anything.
If pulling drawers and everything is fine except one drawer, and no matter what you do, it won't allow your shims past the stop tab, it's possible at some time over the life of the toolbox that someone tried to use brute force to pull out a drawer and it oftentimes bends the stop tab on the drawer slides doesn't leave enough clearance for anything to slip past. Those are the drawers that often prove quite difficult to remove, but thankfully, whoever yanked on the drawer only did it to one drawer while the rest of the drawers posed no problem.
Also try bending the tip slightly upward, but never more than 1/16 inch and flipping the tip each way as you try to insert it. Spray lubricating oil into the suspected area of difficulty inside the box if you think it might help.
If you ever see an old box where the side handles have been badly twisted, it likely spent its life being chained in the back of a service vehicle and I would probably pass because it’s led too hard of a life.
As a businessperson, the real money is in getting non-traditional folks interested in toolboxes and selling to them. I also think you could make extra money by renting a stall at a flea market and doing quick flips of toolboxes there, as well as also networking and becoming known as a toolbox restoration guru where others are seeking your advice or wanting to get rid of an old box quickly and accepting your lowball offer.
As you sit there all day watching your booth, you continue to work on other restoration projects. Flea market folks usually don’t have much money, so don’t pass up a good deal on a budget tool stack because the lower-priced starter sets are liable to sell a little better at a flea market. Not everyone is a collector, not everyone is going to appreciate a premium collectible piece at a flea market.
If a businessperson was trying to stand out, an original vintage workshop design with antique furniture & antique metal toolboxes for a total period look and could be an additional selling feature, especially if catering to the yuppie crowd or where women were a sizeable percentage of your customer base, no different than when doctors and other merchants spent great expense for unique office furniture and elaborately decorated medical supply cabinets.
The hokey Snap-on collectible edition boxes where it’s nothing more than a stupid large decal on the front panel is one type I would pass on because there is nothing remarkable about the box or its appearance otherwise. Any decal in a garage environment isn’t going to age well after being exposed to chemicals and corrosive automotive & diesel exhaust residue.
The best way that I’ve found to detail paint whenever attempting to restore an old badge or medallion is by using various thicknesses of wire instead of a brush where I am better able to control the size of my drop and it also flows easier, no brush dabbing necessary, then wrap fine emery cloth around a wooden block for polishing the metal around around the edges of the inlay.
The one thing that does vary with Snap-on's drawer slides over the years is their height, so never assume all Snap-on slides are the same, that Snap-on has made many different models over the years. If a Snap-on drawer slide is too long, but otherwise correct, simply cut down and re-rivet the metal stop tab back onto the end.
Being able to quickly remove the drawers on an old metal tool cabinet makes it surprisingly easy to move a large tool cabinet without needing to depend on others. It also makes it very easy to move it up or down a tight flight of stairs.
If wanting to decorate Snap-on drawers and other brands with a plain metal edge, a colored vinyl or plastic car door edge guard is another toolbox customizing material with great potential.
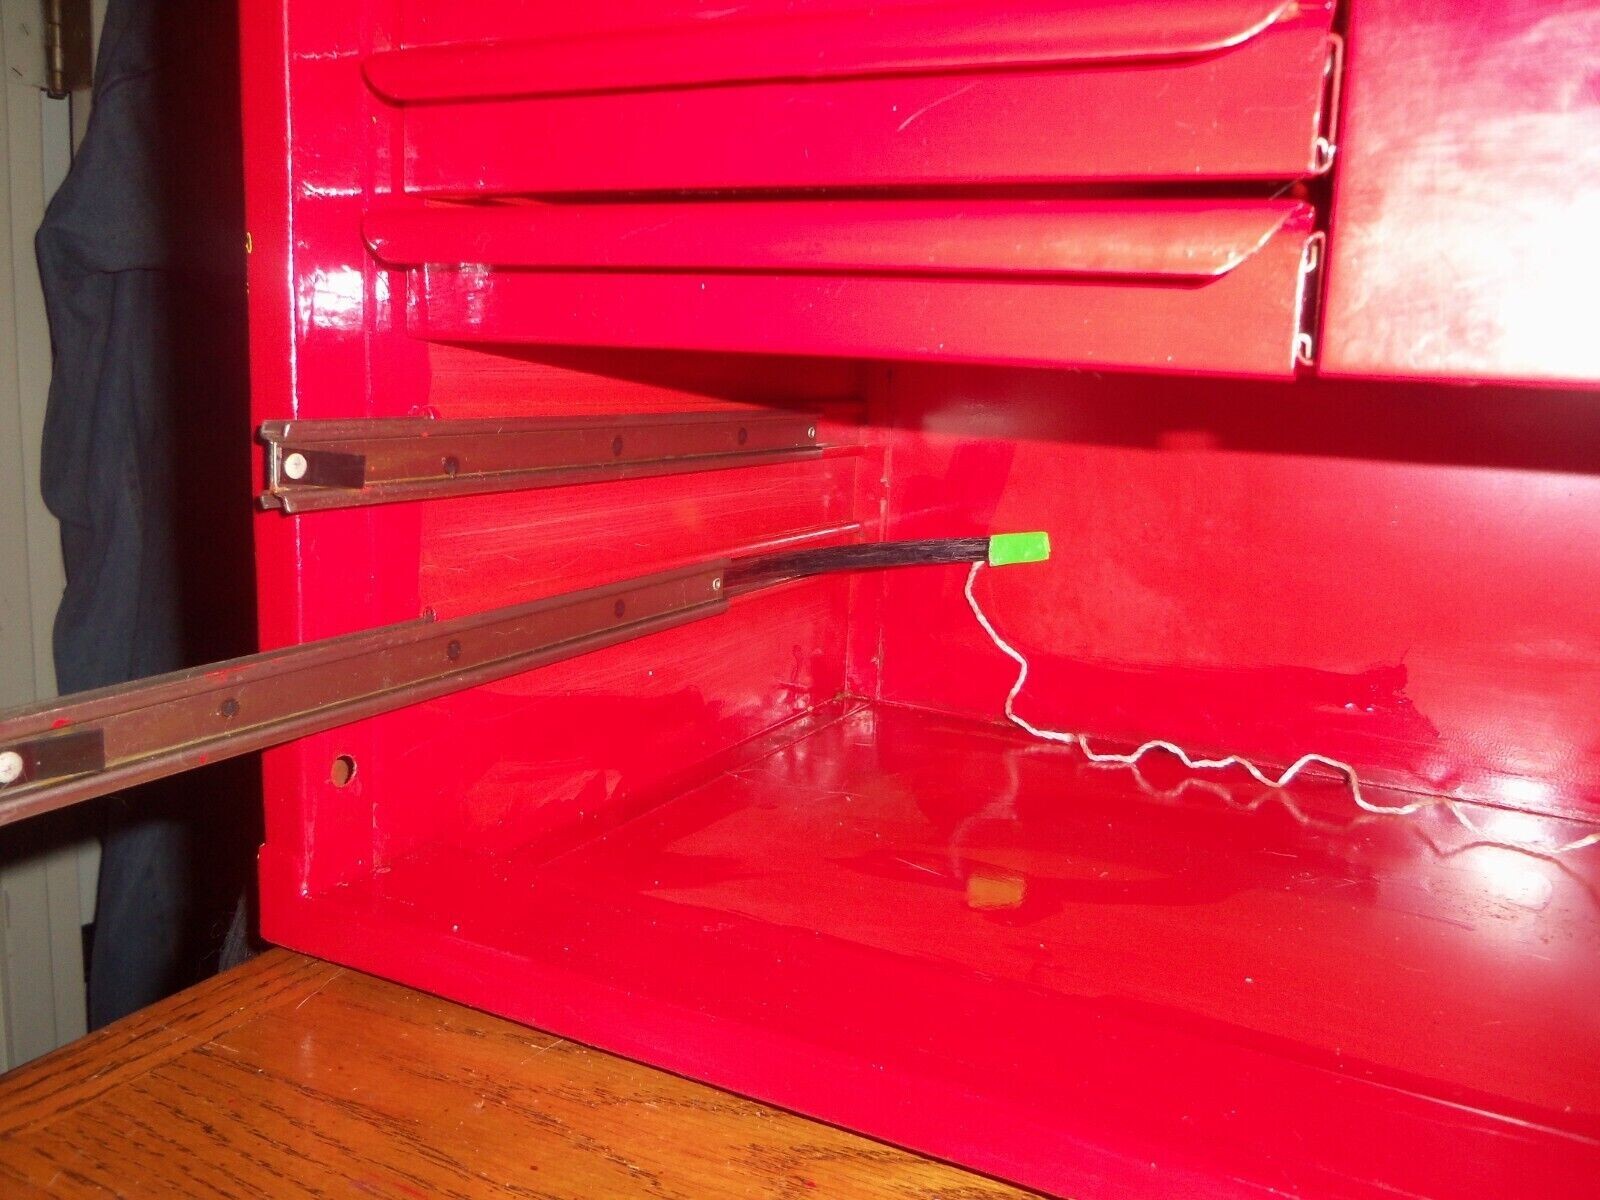
No matter the brand or age of a toolbox, a 3/8 & 1/2 inch wide shim is all you would ever need. It's the internal drawer locking systems that vary widely among toolbox brands.
Snap-on has never manufactured anything smaller or larger to my knowledge, and 3/8 should be the only thing you would ever need with their product line.
If this is the case, I would suggest trimming the other end of the shims down with tin snips, don't ruin the other end, the one that already has a finished tip. Check to see if the stop tab on the drawer slide is near the ends or in the middle, such as on a Huot box, which would tell you how long to trim the width back. Only ruin one shim so at least you still have one good one to work with.
It's hard to explain, but tin snips cut in all types of angles and a green-handled aviation snip is the best to work with because it allows you to clearly see the piece you are trying to cut. Their thinner blade profile also facilitates working in tighter areas. Unless a big metal worker, the green-handled aviation snips are the only way to go, even better than a short bulldog-nosed tin snip, and don’t waste your money on an expensive combo set because most will never be used by the average person.
Important differences among Snap-on toolboxes; Early Snap-on tool cabinet stacks from the 1950s thru 1970s is there were 2 different widths & depths even though both stacks basically look identical. The wider width had a double handle classic top chest, and the intermediate box had a recessed metal panel that folded down over the front while the 26-inch-wide intermediate box did not. Other than a difference in width, both base carts were still 18 inches deep. And for the top and intermediate pieces, the 31-inch-wide Snap-on models were 15 inches deep while the 26-inch wide top & intermediate were only 12 inches deep. On earlier toolbox models, I don’t think Snap-on ever went with anything more than 22 inches deep with base cabinets with the exception of their towable factory maintenance carts.
Earlier Snap-on factory maintenance carts used the same drawers and drawer slides from a 31-inch-wide set. The maintenance cart overall is 24 x 45 inches wide. The earlier maintenance carts with heavy steel wheels are the most desirable. No matter the brand of toolbox purchased, please double-check with the seller on the exact measurements. I once made a trip to purchase a 3/4 inch socket set only to discover it was a 1/2 inch set the seller had been wrong, but it taught me an important lesson about not being afraid to ask a few additional questions about measurements & condition.
Vulcan was an early Snap-on knock-off, but craftsmanship and ruggedness were still present and they were identical in appearance, but they could likely be rebadged with a regular metal Snap-on badge, preferably a square badge style to hide any old holes.
While Snap-on has manufactured a wide variety of special models, some of the rarer early pieces are their 9-drawer top chest with double folding cover panel, any tool cabinet model where it’s mounted on what appears to be metal automotive leaf springs with caster wheels instead of simply mounting the wheels on the underside of the base cabinet. The mid-30s deluxe cabinet with all the drawers that everyone seems to want is near the top of Snap-on collectability and near the price of a good used car. A modern replica has been made, but while still a nice piece, production has been simplified and it’s not the same.
While I own a nice Kennedy 11-drawer top chest that has been incorporated into a homemade computer desk, I decided not to collect Kennedy due to the overall higher cost, especially for their base carts and because of the way their plastic drawer pulls are fastened in a manner that makes them impossible to remove for painting. What makes certain models of Kennedy boxes desirable for furniture making is their slimmer depth, 8.5 inches vs 12. The smaller drawers work very well for office & craft supplies & tools.
From a collectability standpoint, top & intermediate Kennedy toolbox sets are vastly more common than complete Kennedy toolbox stacks or standalone base carts. While I’ve bought plenty of boxes from Facebook classifieds, it seems that my rarer or older pieces were purchased on Craigslist or K-bid. Over the years, Kennedy used two different drawer slide types, the earlier boxes had small removable metal locking pins where a needle nose pliers is all that was required. Later boxes have the drawer riveted to the drawer slide which would mean that 22 rivets would need to be drilled to remove 11 drawers and I don’t think a small nut & bolt could be substituted for a rivet when reassembling. The drawers would still function without a rivet, but you would want to be careful of accidentally pulling them out.
Another reason I decided not to go with Kennedy was their use of a separate front metal cover panel over the drawer section that is not permanently affixed to the toolbox as well as their dreary dark brown finish. I like the boxes in my own collection to be a wide variety of bright colors instead of black or brown. A roomful of black toolboxes can be quite depressing.
With Kennedy, there is a 20-inch wide 7-drawer student box and a 26-inch wide 8-drawer toolbox that is something of an unwanted bastard child because everyone mainly wants the 11-drawer deluxe model. One thing to beware of is that Kennedy made 2 intermediate boxes 20 & 26 inches wide. I think the 20-inch-wide Kennedy intermediate box is relatively uncommon because I haven’t seen too many listed in the classifieds over the years. Generally speaking, the standard width for most newer & older toolbox brands is 26 inches give or take an inch. Then it goes to 41 & 52 inches wide for most larger tool cabinet sizes.
With Craftsman, the most desirable pieces are the 11 or 12-drawer base cart and a 12-inch deep top chest that says Limited Edition and a rare 4-drawer intermediate box. Used Craftsman boxes of any variety are usually the most economical way to build a nice toolbox stack that isn’t some off-brand piece of junk.
eBay is your best bet if looking for vintage replacement toolbox parts, set a bidder alert keyword to be notified of any new listings. I once needed a rare drawer slide set for an older Snap-on box and even though I had to wait a year or so, they eventually showed up, so please be patient and don't scrap or pass on an otherwise nice tool cabinet and even if you have a bad drawer slide or two, just live with it until a replacement eventually shows up for sale. A wide variety of reproduction toolbox badges & factory decals are also offered on eBay.
Snap-on Sales Promotional Themes By Year---(Incomplete)
1972 Allstar Performer; 1975 Great Opportunities; 1976ShowYour Spirit; 1979 #1 Sales, Service & Quality(unsure); 1980 Tool Magic;1981 Red Hot & Rollin; 1982 The Great Race; 1983 Success Express;1984Winning Spirit; 1985 Out Front & Breaking Away; 1986 On The Move;1987Running Strong; 1988 Leading The Way; 1990 Charging to New Horizons; 1991Big Time / Big Time 90s; 1992 Fast Trackin; 1993 Meeting The Challenge; 1994The Pro's Advantage; 1996 Exploding Into The Future; 1997 Nothing Even ComesClose;1998 Go For The Gold; 1999 Big Bang; 2000 #1Worldwide(unsure), 2002 Right Time, Right Tool, Right Now; 2004 Powerup.
I will help you to extract the drawers from your old metal tool cabinet, no matter if female or mechanically uninclined and once the drawers have been pulled, it's easy to figure out after that, it's no different than refinishing any old metal box that requires a good cleaning, sanding & painting.
Even if a novice, I say go ahead and buy a nice big tool cabinet without fear of ever being stumped on how to remove the drawers, go ahead and buy something that you really like. Deals on toolboxes can always be found and even a newbie still has the ability to make a nice profit in the toolbox restoration business if willing to work and developing an economical and streamlined system of restoration.
Please see my other listing for an aftermarket Snap-on shim because I go into greater detail about the basics of toolbox furniture building.
--------------------------------------------------------------------------------------------------------------------------------------------------------------------------------------------
No matter when I prepare an order, I always try to mark it as being shipped on the day it went out so I have a better idea of how long it’s actually been in the system in the event someone does complain.
Please don't believe eBay’s shipping tracker because it's not accurate, I only ship using regular post office forever stamps without any barcoding, so eBay’s shipping calculator doesn't know what it's talking about.
The date I mark the package as shipped is the day it went into the system. In case you don't already know, it's possible to buy deeply discounted forever stamps on Ebay and they work, I've never had a package rejected for using bootleg forever stamps.
By mailing the shims as a regular letter you have greater odds of receiving your package because it isn't sitting out somewhere in the open, they fit through a regular narrow letter slot.
No need to file complaints, just let me know and I'll be happy to send out another set, it's just part of doing business.
Please read both shim listingsbecause they contain important time & money saving restoration shortcuts,it was too much information for one listing and it is also liable to help youavoid paying too much for a marginal old box, or restoring a dud model thatfew people want.
---
---
---
---
NO TRACKING OFFERED, IT ADDS ANOTHER 4 DOLLARS TO THE PRICE.
YOU WILL GET YOUR SHIMS or YOUR MONEY BACK, BUT I HAVE NO CONTROL OVER THE POST OFFICE AND THAT'S WHY I'M SAYING TO WAIT AT LEAST 2 WEEKS.
Please check your Ebay messages, especially if you haven't received your shims in a reasonable amount of time because I often receive postal returns and I have someone becoming increasingly angry despite me sending them multiple emails.